开源UReport 整合到产品中实践简要:(四)UReport 自定义mysql数据库表的存储器
本文共 5425 字,大约阅读时间需要 18 分钟。
一、默认报表存储器:
UReport2默认提供的名为“服务器文件系统”的报表存储机制,实际上是实现了UReport2提供的com.bstek.ureport.provider.report.ReportProvider接口。接口源码如下:
import java.io.InputStream;import java.util.List;/** * @author Jacky.gao * @since 2016年12月4日 */public interface ReportProvider { /** * 根据报表名加载报表文件 * @param file 报表名称 * @return 返回的InputStream */ InputStream loadReport(String file); /** * 根据报表名,删除指定的报表文件 * @param file 报表名称 */ void deleteReport(String file); /** * 获取所有的报表文件 * @return 返回报表文件列表 */ List getReportFiles(); /** * 保存报表文件 * @param file 报表名称 * @param content 报表的XML内容 */ void saveReport(String file,String content); /** * @return 返回存储器名称 */ String getName(); /** * @return 返回是否禁用 */ boolean disabled(); /** * @return 返回报表文件名前缀 */ String getPrefix();}
实现了ReportProvider接口后,只需要将实现类配置到Spring中,让其成为一个标准的Spring Bean,这样UReport2就会检测到它而将其加载。
如果想要禁用系统提供的默认报表存储器,只需要把 ureport2-core 包下的 ureport.properties 文件拷贝一份放到自己的根目录下:
配置文件内容如下:
ureport.disableHttpSessionReportCache=false ureport.disableFileProvider=true ureport.fileStoreDir=/WEB-INF/ureportfiles ureport.debug=true
将ureport.disableFileProvider改成true,即可禁用默认报表存储器。
二、自定义mysql 报表存储器
如果想要定义自己的报表存储器,只需要实现了ReportProvider接口后,并将实现类配置到Spring中,让其成为一个标准的Spring Bean,这样UReport2就会检测到它而将其加载。
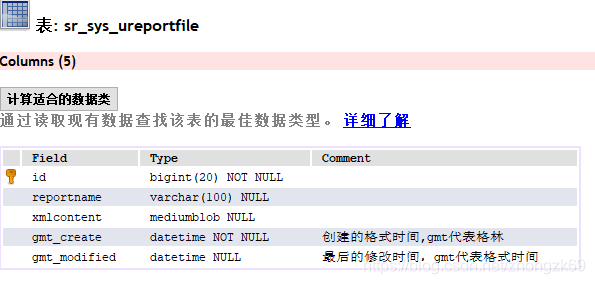
同时设计一个表结构,具体可以参考(转载,这里要感谢作者):,我的代码也借鉴了他们的做法。
三、表结构(id是雪花主键)

四、代码结构:(把ureport定义内部数据源和自定义存储器放在同一个模块中,形成ureport报表公用模块)


五、核心代码:
package com.zjm.gwork.ureport.reportProvider.provider;import com.bstek.ureport.provider.report.ReportFile;import com.bstek.ureport.provider.report.ReportProvider;import com.zjm.gwork.ureport.reportProvider.model.SysUreportfile;import com.zjm.gwork.ureport.reportProvider.service.UReportFileService;import com.zjm.gwork.utils.KeyWorker;import lombok.Setter;import org.springframework.beans.factory.annotation.Autowired;import org.springframework.boot.context.properties.ConfigurationProperties;import org.springframework.stereotype.Component;import java.io.ByteArrayInputStream;import java.io.InputStream;import java.io.UnsupportedEncodingException;import java.util.ArrayList;import java.util.Date;import java.util.List;import java.util.UUID;// 作者 热水 2020.2.2 3:30@Setter@Component// 该注解可以利用其 prefix属性值 + 类的属性名 在yml中配置属性值@ConfigurationProperties(prefix = "ureport.mysql.provider")public class MySQLProvider implements ReportProvider { // 自定义存储器的名称(相当于中文名称) private static final String NAME = "mysql-provider"; // 自定义存储器的code(相当于英文名称), 特定前缀,ureport底层会调用 getPrefix 方法来获取报表操作的Provider类 // 即为了前端时调用:这里的报表名称要以其ReportProvider中要求的前缀开始,比如http://localhost:8080/ureport2-demo/ureport/preview?_u=mysql:test.ureport.xml等。 private String prefix = "mysql:"; // 声明的全局变量,当appliction中的ureport.mysql.provider.prefix 这个属性没有设置时,用这个作为前缀,否则以ureport.mysql.provider.prefix中的内容作为前缀。 // 是否禁用 private boolean disabled = false; @Autowired private UReportFileService uReportFileService; @Override public InputStream loadReport(String file) { // 这时候的file它有前缀,所以要去掉 //System.out.println("报表物理文件名:" + file); SysUreportfile ureportFileEntity = uReportFileService.getReportFileByName(getCorrectName(file)); byte[] content =ureportFileEntity.getXmlcontent(); ByteArrayInputStream inputStream = new ByteArrayInputStream(content); return inputStream; } @Override public void deleteReport(String file) { uReportFileService.removeReportFileByName(getCorrectName(file)); } @Override public List getReportFiles() { List list = uReportFileService.listAllReportFile(); List reportList = new ArrayList<>(); for (SysUreportfile ureportFileEntity : list) { reportList.add(new ReportFile(ureportFileEntity.getReportname(), ureportFileEntity.getGmtModified())); } return reportList; } @Override public void saveReport(String file, String content) { file = getCorrectName(file); SysUreportfile ureportFileEntity = uReportFileService.getReportFileByName(file); Date currentDate = new Date(); if(ureportFileEntity == null){ ureportFileEntity = new SysUreportfile(); System.out.println("id:" + ureportFileEntity.getId()); // ureportFileEntity.setId(UUID.randomUUID().toString()); ureportFileEntity.setId(KeyWorker.getInstance().getNextId()); ureportFileEntity.setReportname(file); ureportFileEntity.setXmlcontent(content.getBytes()); ureportFileEntity.setGmtCreate(currentDate); ureportFileEntity.setGmtModified(currentDate); uReportFileService.saveReportFile(ureportFileEntity); }else{ ureportFileEntity.setXmlcontent(content.getBytes()); ureportFileEntity.setGmtModified(currentDate); uReportFileService.updateReportFile(ureportFileEntity); } } @Override public String getName() { return NAME; } @Override public boolean disabled() { return disabled; } @Override public String getPrefix() { return prefix; } /** * 获取没有前缀的文件名 * @param name * @return */ private String getCorrectName(String name){ //System.out.println("prefix:" + prefix); if(name.startsWith(prefix)){ name = name.substring(prefix.length(), name.length()); } return name; }}
你可能感兴趣的文章
mysql的函数DATE_ADD()
查看>>
mysql的函数操作
查看>>
mysql的分类排名_mysql高低排名
查看>>
Mysql的分表设计方法 (水平分表和垂直分表)
查看>>
mysql的分页查询limit关键字
查看>>
MySql的创建数据表、约束、外键约束的创建修改删除、级联操作
查看>>
MySQL的删除修改的实验目的_基础篇 - 数据库及表的修改和删除
查看>>
MySQL的四大隔离级别,你都知道哪些?
查看>>
MySQL的四种事务隔离级别
查看>>
MySQL的基本命令
查看>>
Mysql的备份与恢复类型
查看>>
mysql的大小写对性能的影响问题
查看>>
mysql的密码管理、mysql初始密码查找、密码修改、mysql登录
查看>>
mysql的常见八股文面试题
查看>>
MySQL的常见命令
查看>>
mysql的引擎以及优缺点_MySQL有哪些存储引擎,各自的优缺点,应用场景-阿里云开发者社区...
查看>>
MySQL的操作:
查看>>
mysql的数据类型有哪些?
查看>>
MYSQL的最左匹配原则的原理讲解
查看>>
mysql的语法规范
查看>>